How Many Tiles Do I Need? The Simple Wastage Formula
Before you order, a two-minute calculation saves you a second delivery fee or a dye-lot mismatch down the track. Here is the simple formula, a worked example, and a calculator that does the maths for you.
It is the question every renovation reaches sooner or later: how many tiles do I need? Get it right and the job runs smoothly. Order too few and you face a second delivery fee and, worse, a dye lot that no longer matches. Order wildly too many and you have paid for boxes you will return or store for years. The good news is that the maths is simple, and it comes down to one short formula.
The short answer
Measure the area in square metres (length times width), add 10 percent for a straight layout or 15 percent for herringbone, diagonal or large format, then divide by the coverage printed on the tile box and round up to full boxes.
Area (m2) x 1.1, divided by box coverage, rounded up. Use the calculator below to do it for you.
Free tool
Tile quantity calculator
Shown as the Area Coverage on the tile box, and on every Design Tiles product page. Ask us if you are not sure.
12.00
Area (m2)
13.20
With wastage (m2)
10
Boxes to order
That is 10 boxes, covering 14.40 m2. Always round up to full boxes and keep a few spares from the same batch.
How do I calculate how many tiles I need?
You do not need to count individual tiles. Tiles are sold by the box, and every box tells you how many square metres it covers, so the whole job is really about square metres. Here is the method in four steps.
1. Measure the area in square metres
Measure the length and the width of the surface in metres, then multiply the two for the area in square metres. A floor that is 4 metres by 3 metres is 12 square metres. For an L-shaped or irregular room, split it into simple rectangles, work out each one, and add them together. Measure walls separately from floors, since they use different tiles and different quantities.
2. Add your wastage allowance
Wastage is the extra tile you buy to cover perimeter cuts, the occasional breakage, and future repairs. For a standard straight or brick-bond layout, add around 10 percent. For herringbone, chevron, diagonal, French pattern and large format tiles, add closer to 15 percent, because angled and oversized cuts create more offcuts. In practice you simply multiply your area by 1.1 or 1.15.
3. Convert square metres to boxes
Find the coverage printed on the tile box, shown as square metres per box (for example, 1.44 square metres). Divide your total area, wastage included, by that number to get the number of boxes. A 13.2 square metre order divided by a 1.44 square metre box comes to 9.17 boxes.
4. Round up, and keep spares
Because tiles only come in full boxes, always round up: 9.17 boxes becomes 10. Set aside a few tiles from the same batch once the job is done. Tile colours are produced in dye lots, and a replacement bought later rarely matches an older batch exactly, so those spares are your insurance for a cracked tile or a future change.
Worked example: a 4m x 3m floor
How much wastage should I add?
The layout you choose is the biggest factor, because it decides how many tiles get cut at the edges. As a guide, here is what to add for the common patterns. When a room has lots of corners, niches or short runs, lean towards the higher figure.
| Layout | Wastage to add | Why |
|---|---|---|
| Straight / stack bond | +10% | A simple grid with clean perimeter cuts only |
| Brick / running bond | +10% | Offset rows, still minimal cutting |
| Diagonal (45 degrees) | +15% | Angled cuts around every edge waste more tile |
| Herringbone / chevron | +15% | Lots of angled offcuts through the field and edges |
| French / Versailles pattern | +15% | A modular four-size set means more cutting to fit |
| Large format / slabs | +10 to 15% | Fewer cuts, but a breakage wastes a big, costly piece |
For a full breakdown of how each layout looks and behaves, see our guide to tile laying patterns, which covers the wastage for herringbone, chevron, French pattern and more.
How do I convert square metres to boxes?
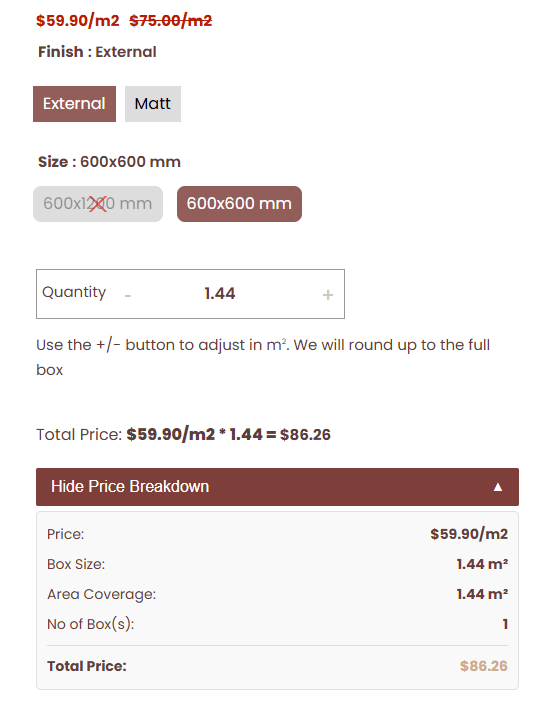
The good news is that with Design Tiles, you do not have to. Tiles are sold by the box, but our online store does the conversion for you. You simply enter the area you need in square metres, and the site automatically rounds up to the nearest full box, then shows you the exact number of boxes and the total price. No division, no guesswork.
You can see it on any product page. The Area Coverage is the number of square metres in one box, the quantity is entered in square metres, and the price breakdown lists how many boxes that works out to. All you need to bring is your area, plus a little wastage.
The mistakes that cost a second order
A few simple slips account for most of the panicked mid-job phone calls we take.
Forgetting wastage entirely. Ordering the exact area with no buffer leaves nothing for cuts or breakages, and no spares at all. Buying across two dye lots. Splitting an order into two purchases risks a visible colour shift, so buy the whole job, spares included, in one go. Measuring walls as though they were floors. Wall tiles and floor tiles are usually different products in different quantities, so measure and order them separately. Ignoring the box coverage. Estimating boxes without checking the coverage on your actual tile is the quickest way to end up short.
Let us do the maths for you
The calculator above will get you very close, and for many projects it is all you need. But if you would rather be certain, that is exactly what our team is here for. Send us your room measurements, or bring your plans into the Rockdale showroom, and we will work out the precise number of tiles and boxes for your chosen tile and layout, allow for the right wastage, and quote it. There is no charge, no pressure, and we can post sample packs anywhere in Australia so you can see the tile in your own light first.
Frequently asked questions
How do I calculate how many tiles I need?
Measure the length and width of the area in metres and multiply them to get the area in square metres. Add a wastage allowance, usually 10 percent for a straight layout or 15 percent for herringbone, diagonal or large format. Then divide that total by the coverage printed on the tile box (the square metres per box) and round up to the next full box. In short: area in square metres, times 1.1, divided by the box coverage, rounded up.
How much wastage should I add when buying tiles?
Add around 10 percent extra for a standard straight or brick-bond layout to cover cuts and breakages. Add about 15 percent for herringbone, chevron, diagonal and French patterns, and for large format tiles, because angled cuts and big pieces create more offcuts. For heavily patterned or irregular work, or a room with lots of corners and niches, lean towards the higher end. Always round up to full boxes.
How do I convert square metres to boxes of tiles?
When you shop online with Design Tiles, you do not need to convert at all. Enter the area you need in square metres and the site automatically rounds up to the nearest full box and shows the number of boxes. If you would rather check it yourself, find the Area Coverage on the box (for example 1.44 square metres), divide your total area including wastage by that number, and round up to the next full box, since tiles are only sold in full boxes.
How many tiles are in a box?
It varies by tile size, so the more useful number is the coverage, which every box lists as square metres per box. A box of large 600 by 600mm tiles might cover around 1.44 square metres, while a box of small mosaics or subways covers less. Work in square metres rather than counting individual tiles, and use the box coverage to convert to boxes.
Should I include doorways and windows in my measurement?
For a floor, measure the full rectangle and do not subtract small doorways, as the offcuts rarely help you and the extra becomes useful spare. For a wall, you can subtract a large window or a door opening if it is significant, but keep the tiles you would have used as part of your wastage buffer. When in doubt, measure the full area and let the wastage allowance absorb it.
How many spare tiles should I keep after the job?
Keep at least a few tiles, ideally close to a full box, from the same production batch. Tile colours are made in dye lots, and a replacement bought a year later rarely matches an older batch exactly. Spares let you repair a cracked tile or adapt to a future change without re-tiling the whole area, which is why a healthy wastage allowance is never really wasted.
Do herringbone and large format tiles need more than 10 percent?
Yes. Angled layouts such as herringbone, chevron and diagonal create more perimeter offcuts, so 15 percent is the safer allowance. Large format tiles and slabs also warrant closer to 15 percent, because a break during handling or cutting wastes a much bigger, more expensive piece. Our tile laying patterns guide breaks down the wastage for each layout.
Can Design Tiles work out how many tiles I need?
Yes, and there is no charge for it. Send us your room measurements, or bring your plans into the Rockdale showroom, and our team will calculate the tiles and boxes for your chosen tile and layout, then quote it. We can post sample packs anywhere in Australia and give you free design guidance in store or online.


Skip the designer fee, come straight to the experts
Our in-house experts at Design Tiles give you free, personal design guidance, in our Rockdale showroom or virtually anywhere in Australia. You get designer-level results and keep the budget for the tiles. Order sample packs to any state, or book a free consultation with the team.